Using the IoT Dashboard App
Using the steps described here, you can develop an app that allows you to get sensor data over MQTT, plot the data in POI details dialogs and show the ones that have exceeded an adjustable threshold. Default POIs can be used alongside custom sensor POIs.
This example has three separate modules that operate individually: The frontend, MQTT broker and the backend.
The frontend is built using the NavVis IVION API. The backend uses Node.js and simulates the sensors. Both modules are written with TypeScript. MQTT broker is a Docker container with RabbitMQ MQTT Broker installed.
To use the IoT Dashboard App, download the sample app.
Backend
The backend is a simple Node.js app that simulates the sensors.
TemperatureSensor and PressureSensor classes represents a sensor instance. They generate pseudo-realistic sensory data that is generated within a range. When the data is generated, it is published to the corresponding MQTT topic. (/iot/temperature/{sensor_id} or iot/pressure/{sensor_id}).
The backend application also exposes several endpoints. /temperature/{sensor_id} lists a temperature sensor's historical data. /pressure/{sensor_id} lists a pressure sensor's historical data.
The sensor ids can be listed using /temperature/ or /pressure/ endpoints.
You can run the backend using the following commands in the iot-dashboard-backend folder:
npm install
npm start
Setting up MQTT Broker
MQTT Broker is a standard Docker container with RabbitMQ MQTT broker installed.
Frontend
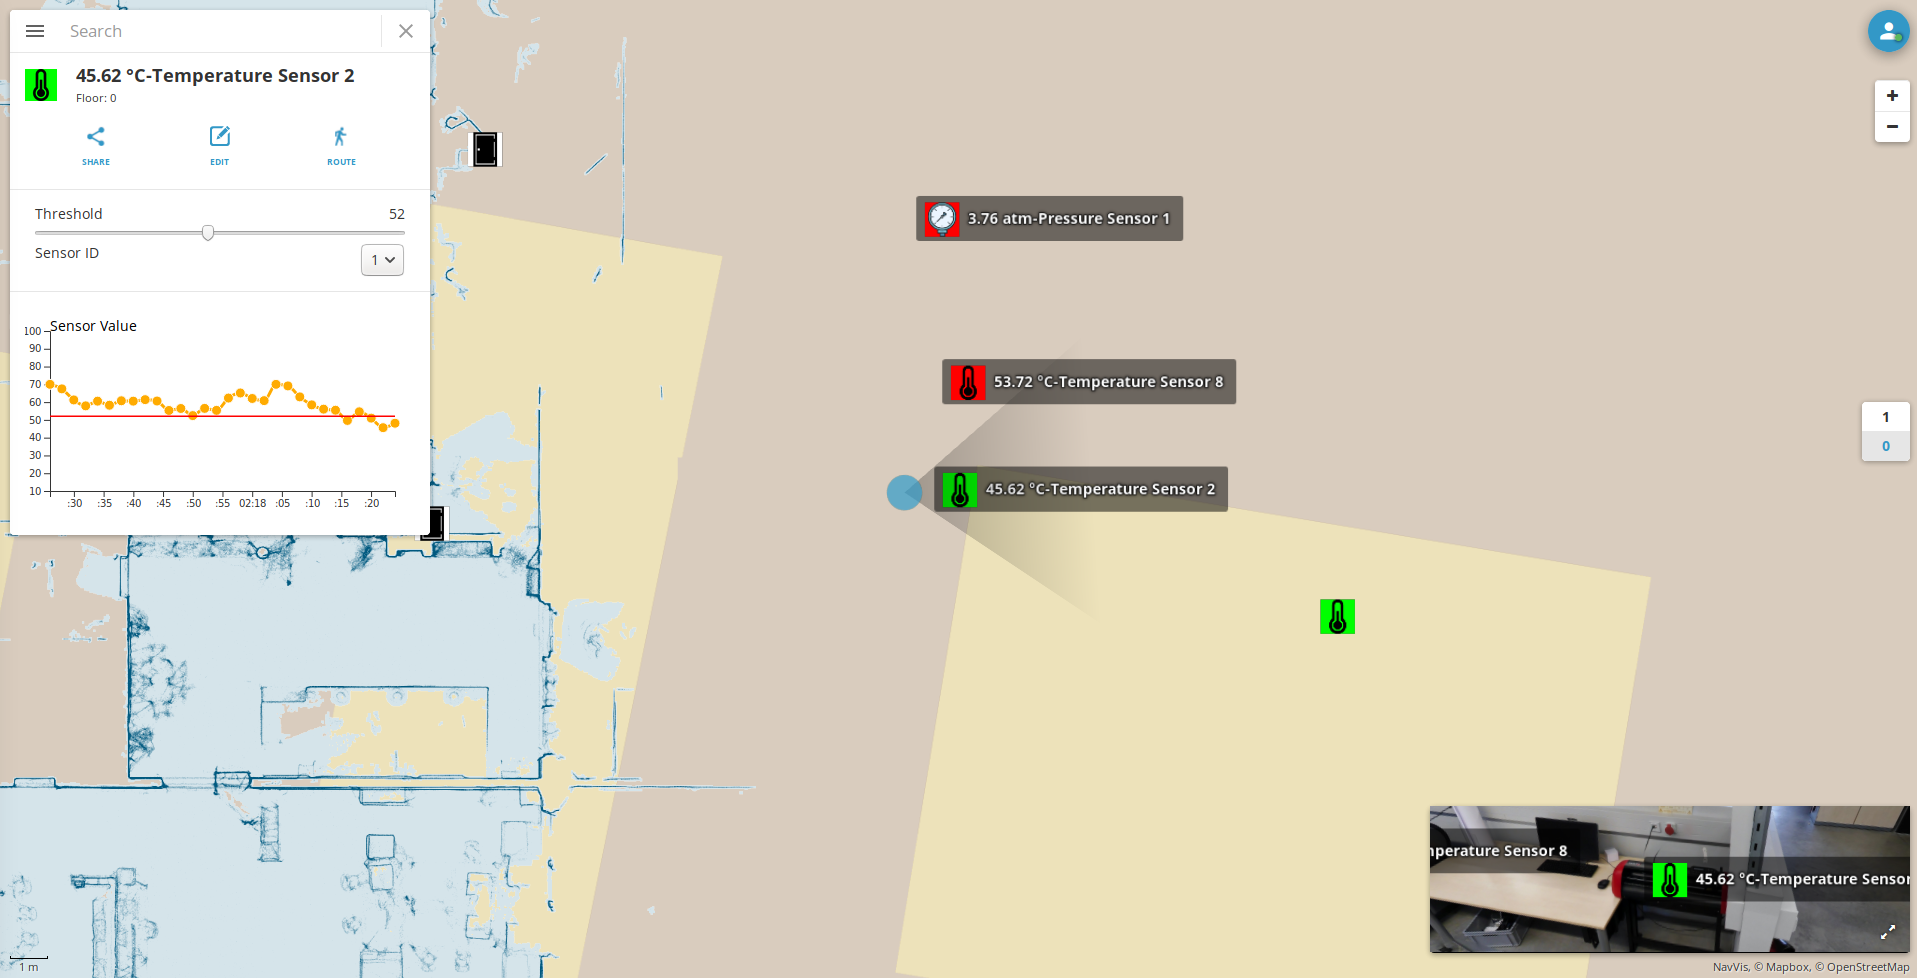
The frontend module is responsible for getting sensor data via MQTT, plotting the data in POI details dialogs and showing the ones that have exceeded an adjustable threshold.
POIs that exceed a certain threshold will enter alert mode. Their icon will change and they will be displayed in the site menu dashboard.
This is accomplished by defining new POI groups and types. In this case Temperature is the POI group and Temperature Normal and Temperature Alert are the types that belong to the group.
POIs that have a sensor attached to them switch to the Alert POI type when the sensor exceeds a certain threshold value. They will return back to the Normal POI type when the sensor no longer exceeds the threshold.
Default POIs can be used alongside custom sensor POIs.
What the frontend does can be summarized as follows:
- Find all nearby POIs that have a sensor attached to them.
- Subscribe to the MQTT topics of the nearby POIs.
- Update the POIs according to the incoming data.
- Periodically update the site menu dashboard with POIs that have exceeded their threshold values.
The app contains reusable components. The three main components are: PoiChart, PoiConfiguration, SidebarMenuDashboard. It also has several helper services: PoiHelperService, SensorDataHelperService, ToggleablePoiService and CommunicationService.
Running the Frontend
npm install
npm run serve
Components
The app has three main components (PoiChart, PoiConfiguration, SidebarMenuDashboard) and an abstract parent class PoiDialogModule.
PoiChart
PoiChart is a class that contains all the functions that are needed to create and append a chart to a POI dialog. It extends the parent class PoiDialogModule.
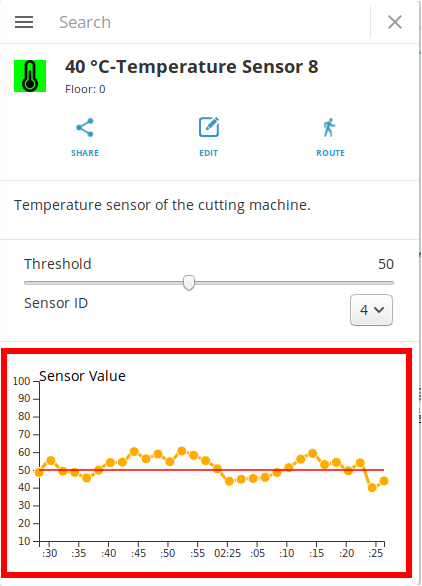
Its main function drawChart receives three parameters.
// ./src/js/components/poi-chart/PoiChart.ts
...
public drawChart(chartData: FormattedSensorDatum[], threshold: number, yDomain: number[]): void
...
chartDatais the historical data of the current POI. It is listed by the backend using/temperature/{sensor_id}or/pressure/{sensor_id}endpoints and formatted usingSensorDataHelperService.thresholdis a number that is used to draw the threshold line in the chart.yDomainis the range for which the chart will be drawn. For example, if theyDomainis [10,100] the chart will have a minimum value of 10 and a maximum value of 100 on the y-axis.
PoiChart. // ./src/js/index.ts
...
this.poiChart.drawChart(this.historicalData, this.threshold, this.SENSOR_TYPES[type].range);
...
PoiConfiguration
PoiConfiguration is a class that appends a configuration panel with various input fields to the POI dialog. It extends the parent class PoiDialogModule.
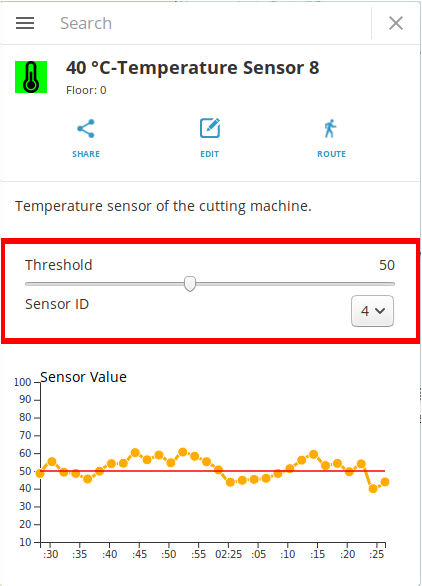
addToDialog receives one parameter.// ./src/js/components/poi-configuration/PoiConfiguration.ts
...
public addToDialog(configs: Configuration): InputBoxesDictionary
...
configs is the configuration template that is used to define the input fields. // ./src/js/components/poi-configuration/PoiConfiguration.ts
...
export type Configuration = {
[key: string]: {
label: string,
type: ConfigsType,
min?: number,
max?: number,
options?: HTMLOptionElement[],
value: number
};
}
...
The addToDialog function returns a dictionary of HTMLElement representing the input field boxes. The key of each entry corresponds to the key of the Configuration object.
PoiConfiguration. // ./src/js/index.ts
...
const configs: Configuration = {};
configs["threshold"] = {
label: "Threshold",
type: ConfigsType.SLIDER,
min: this.SENSOR_TYPES[poiGroup].range[0],
max: this.SENSOR_TYPES[poiGroup].range[1],
value: customData.threshold || this.SENSOR_TYPES[poiGroup].threshold
};
configs["sensorId"] = {
label: "Sensor ID",
type: ConfigsType.DROPDOWN,
options: options,
value: customData.sensorId || 0
};
const inputBoxes = this.poiConfiguration.addToDialog(configs);
...
SidebarMenuDashboard
SidebarMenuDashboard is a class that contains all the functions needed to create a site menu sensor dashboard. refreshItems receives one parameter.// ./src/js/components/sidebar-menu-dashboard/SidebarMenuDashboard.ts
...
public refreshItems(pois: PoiInterface[]): void
...
pois is the PoiInterface array that will be shown in the site menu.// ./src/js/index.ts
...
const poisOnAlert: PoiInterface[] = [];
for (const poi of Object.values(this.nearbyPois))
{
const customData: PoiCustomData = JSON.parse(poi.customData);
if (customData.value > customData.threshold)
{
poisOnAlert.push(poi);
}
}
this.sidebarMenuDashboard.refreshItems(poisOnAlert);
...
Services
The app has four main services: PoiHelperService, SensorDataHelperService, ToggleablePoiService, CommunicationService.
PoiHelperService
PoiHelperService contains helper functions to fetch or modify POIs.
It has four public functions.
savePoi saves a POI to the server.// ./src/js/services/PoiHelperService.ts
/**
* Save the POI to the server.
* @param {PoiInterface} poi POI to be saved
* @returns {Promise<PoiInterface>} A promise with the saved POI object from the server.
*/
public savePoi(poi: PoiInterface): Promise<PoiInterface>
{
return this.ivApi.poi.repository.save(poi).then((pois) =>
{
  const savedPoi = pois[0];
  return savedPoi;
});
}
savePois saves acPOI array to the server.// ./src/js/services/PoiHelperService.ts
/**
* Save the POIs to the server.
* @param {PoiInterface[]} pois POIs to be saved
* @returns {Promise<PoiInterface>} A promise with the saved POI objects from the server.
*/
public savePois(pois: PoiInterface[]): Promise<PoiInterface[]>
{
return this.ivApi.poi.repository.save(pois).then((pois) =>
{
const savedPois = pois;
this.ivApi.poi.service.refreshPois();
return savedPois;
});
}
updateCustomData updates the customData of a POI. customData holds the threshold value, sensor id and sensor value.// ./src/js/services/PoiHelperService.ts
/**
* Update the customData of a specific POI.
* @param {number} id Poi id
* @param {string} customData Poi custom data
* @returns {Promise<PoiInterface>} A promise with the saved POI object from the server.
*/
public updateCustomData(id: number, customData:string): Promise<PoiInterface>
{
return this.ivApi.poi.repository.findOne(id).then((poi) =>
{
poi.customData = customData;
return this.savePoi(poi).catch((e) => console.error(e));
});
}
initPoiTypes checks whether required POI types and groups exist. If they do not exist, it creates them.
SensorDataHelperService
SensorDataHelperService contains the functions needed to organize and format sensor data.
It has three functions.
formatSensorData formats data taken from the backend.// ./src/js/services/SensorDataHelperService.ts
/**
* Formats the sensor data, removes unnecessary fields, changes the timestamp to a JS Date object.
* @param {SensorDatum[]} data Unformatted sensor data array
* @returns {FormattedSensorDatum[]} Formatted sensor data array
*/
public formatSensorData(data: SensorDatum[]): FormattedSensorDatum[]
{
const formattedData: FormattedSensorDatum[] = [];
for (let i = 0; i < data.length; i++)
{
formattedData[i] = {
value: data[i].value,
date: new Date(data[i].timestamp)
}
}
return formattedData;
}
getArrayWithLimitedLength returns an empty array with a maximum length. If the array tries to exceed that limit, the last element gets popped.// ./src/js/services/SensorDataHelperService.ts
/**
* Gives an array with a maximum length. If the array tries to exceed that limit, the last element gets popped.
* Used for storing sensor historical data.
* @param {number} length Maximum desired length of the array
* @returns {FormattedSensorDatum[]} Array with limited length
*/
public getArrayWithLimitedLength(length: number): FormattedSensorDatum[]
{
const array: FormattedSensorDatum[] = [];
array.push = function()
{
if (this.length >= length)
{
this.shift();
}
return Array.prototype.push.apply(this, arguments);
};
return array;
}
isSensor checks whether a POI group supports adding sensors.// ./src/js/services/SensorDataHelperService.ts
/**
* Checks whether the given POI group supports adding sensors.
* @param {string} poiGroup POI group name
* @param {SensorTypeDictionary} sensorTypes POI group name
* @returns {boolean} true if POI group supports sensors
*/
public isSensor(poiGroup: string, sensorTypes: SensorTypeDictionary): boolean
{
return (Object.keys(sensorTypes).includes(poiGroup));
}
ToggleablePoiService
ToggleablePoiService contains all the functions that are needed to create a toggleable POI. In the current system the POI type (Temperature, Pressure) is POI group type and POI states (Alert, Normal) are POI types.
It has two functions.
switchPoiToOn sets the POI type to alert.// ./src/js/services/ToggleablePoiService.ts
public switchPoiToOn(poi: PoiInterface): PoiInterface
switchPoiToOff sets the POI type to normal.// ./src/js/services/ToggleablePoiService.ts
public switchPoiToOff(poi: PoiInterface): PoiInterface
CommunicationService
CommunicationService contains helper functions to fetch data from a remote location.
It has a main function called fetch and several functions that are dependent on the app.
fetch is used to send a HTTP GET request to a remote location. It returns a promise in the type of the output data.// ./src/js/services/SensorDataHelperService.ts
/**
* Fetch some data from an endpoint. Sends HTTP GET request, with response type = json.
* @param {string} endpoint POI to be saved
* @template T
* @returns {Promise<T>} A promise that holds the response of the GET request.
*/
private fetch<T>(endpoint: string): Promise<T>
CommunicationService additionally has two app dependent public functions that use fetch: fetchHistoricalData and fetchSensorIds.
NavVis IVION Functionality
The following functionalities are used to build this app.
View API
this.ivApi.view.service.setPrimaryView(ViewType.MAP);
onTransitionEnd signal.this.ivApi.view.service.onTransitionEnd.connect(() =>
{
this.subscribeToNearbyPois();
});
const camera = this.ivApi.view.mainView.getCamera();
UI API
The UI API is used to add new sidebar menu items.
this.ivApi.ui.sidebarMenuService.items.push(this.sidebarMenuDashboard.dashboard);
The closeMenu method is used to close the sidebar menu.
this.ivApi.ui.sidebarMenuService.closeMenu();
POI API
The POI API is used extensively throughout the application.
onPoiOpen signal is used to check when a POI is clicked. It is used to append custom elements to the default POI dialog.
onPoiDelete is used to clean up the subscribed MQTT topics and several arrays after a POI delete.
onPoiClose is used to clean up the current (open) POI variable.
onPoiSave is used to assign default threshold and sensor id values if a newly created POI is in a type that supports sensor data.
findAll is used to query all POIs.
this.ivApi.poi.repository.findAll().then((pois) => { ... }
The findOne method is used to query one POI with its id.
this.ivApi.poi.repository.findOne(id).then((poi) => { ... }
The unhighlightPois method is used to unhighlight given POIs.
this.ivApi.poi.service.unhighlightPois(pois);
The highlightPois method is used to highlight given POIs.
this.ivApi.poi.service.highlightPois(nearbyPois);
The goToPoi method is used to move the camera next to the POI.
this.ivApi.poi.service.goToPoi(poi).catch((err) => {console.log(err)});
The openPoi method is used to open the POI dialog.
this.ivApi.poi.service.openPoi(poi);
The save method is used to save a given POI or POI array to the server.
return this.ivApi.poi.repository.save(poi).then((pois) =>
{
const savedPoi = pois[0];
return savedPoi;
});